本文对应操作系统及 hbuilderx 版本等
-
-
操作系统
macOS
HbuilderX
3.4.18.20220630
Vue
2.x
uView
1.x
1. 项目背景 这是一个嵌套在 flutter 里的 h5 项目,外面壳子是 app,里面大部分的页面是 h5,app 直接用 webview 显示 h5 页面
2. 开发 h5 为什么要用 uniapp? 因为还要开发微信小程序,使用 uniapp,可以跨平台,节省时间
3. 项目初始化 项目初始化是使用HBuilderX 可视化界面 创建的项目,没有使用vue-cli 命令行 的方式。
通过官方 IDE 的方式创建的项目,这给后面项目 CI/CD 构建部署,就带来了麻烦。因为不是命令行创建的项目,没法在 linux 里执行命令,只有在本地打包完,然后上传打包完的unpackage目录进行部署。当然使用 HBuilderX 也有很多方便的地方。
3.1 uni-app HBuilderX 工程与 vue-cli 工程相互转换 HBuilderX 工程转换为 vue-cli 工程 ,看到评论区有坑,而且项目一大,遇到坑不一定能解决掉,这样代价就大了。
3.2 通过 HBuilderX 方式创建的项目,可以调用 hbuilderx 的打包命令吗? 也就是通过命令行调用 hbuilderx 的打包功能
但是这样还是没有一开始通过 vue-cli 命令行的方式方便,而且都是在本地 windows 或者 mac 上打包,没法在 linux 上通过 shell 脚本执行打包。最终只能是本地打包完,上传 git 仓库。这里有优雅的解决方式的,评论区分享下。
3.3 通过 HBuilderX 方式创建的项目,可以使用 npm 吗? 官方文档明确说,可以的
4. 生产打包去除console 官方文档
1 2 3 4 5 6 7 8 9 10 11 12 13 14 15 16 17 module .exports = {chainWebpack : (config ) => {optimization .minimizer ("terser" ).tap ((args ) => {const compress = args[0 ].terserOptions .compress ;drop_console = true ;pure_funcs = ["__f__" , return args;
5. HBuilderX 创建的项目打包时如何区分环境? 意思就是,如何像执行npm run build:dev执行的测试环境打包,npm run build:prod执行的是生产环境打包。
官方文档
自定义发行-package.json 中添加配置
1
2
3
4
5
6
7
8
9
10
11
12
13
14
15
16
17
18
19
20
21
22
23
24
25
26
27
28
29
30
{ "uni-app" : { "scripts" : { "h5-prod" : { "title" : "h5:prod" , "browser" : "" , "env" : { "UNI_PLATFORM" : "h5" , "NODE_ENV" : "production" , "DEPLOY_ENV" : "prod" } , "define" : { "CUSTOM-CONST" : true } } , "h5-dev" : { "title" : "h5:dev" , "browser" : "" , "env" : { "UNI_PLATFORM" : "h5" , "NODE_ENV" : "development" , "DEPLOY_ENV" : "dev" } , "define" : { "CUSTOM-CONST" : true } } } } }
添加后,本地开发,就可以在菜单运行 - h5:dev本地启动项目,发行 - 自定义发行 - h5:dev测试环境打包,当然点击发行 - 自定义发行 - h5:prod是生产环境打包。
6. 根目录vue.config.js中如何获取到自定义 process 变量? 因为想在测试环境打包时保留代码中的 debugger 日志,生产环境打包的时候去除日志打印。
像上面定义的process.env.DEPLOY_ENV这个变量,业务代码中可以正常获取到,但是在 vue.config.js 这个配置文件中拿不到。
安装dotenv
修改vue.config.js
1
2
3
4
5
6
7
8
9
10
11
12
13
14
15
16
17
18
19
20
21
require ("dotenv" ).config ();module .exports = {chainWebpack (config ) {when (process.env .NODE_ENV === "production" , (config ) => {if (process.env .UNI_SCRIPT === "h5-prod" ) {optimization .minimizer ("terser" ).tap ((args ) => {const compress = args[0 ].terserOptions .compress ;drop_console = true ;pure_funcs = ["__f__" , return args;
7. 打包 h5 过后文件名过长问题 项目稍微大点,页面目录嵌套深一点,打包出来的文件名称巨长,甚至达到 100 字符长度以上。文件名过长,就会带来很恶心的问题,比如被 nginx 拦截,拿不到文件内容,导致页面挂掉。
1 2 3 4 5 6 7 8 9 10 11 12 13 14 15 16 17 18 19 20 21 module .exports = {chainWebpack : (config ) => {when (process.env .NODE_ENV === "production" , (config ) => {output filename ("static/js/[name]-[contenthash].js" )chunkFilename ("static/js/[id]-[chunkhash].js" );optimization .splitChunks ({name : function (module , chunks, cacheGroupKeyconst moduleFileName = module identifier ()split ("/" )reduceRight ((item ) => item);const allChunksNames = chunks.map ((item ) => item.name ).join ("~" );return `${moduleFileName} ` ;
8. 打包 h5 后chunk-vendors文件体积过大,而且页面部署后打开也很慢 庆幸的是,暴露了vue.config.js这个文件交给开发者,不然处理起来真的头大。
8.1 首先启用manifest.json配置文件中的tree-shaking配置,“摇掉”那些冗余代码 8.2 移除 prefetch 插件 module .exports = {chainWebpack : (config ) => {plugins .delete ("prefetch" );
8.3 打包进行 gz 或 br 压缩
安装compression-webpack-plugin
这里有一个问题,7.x 版本后只支持 webpack5.x 版本,这里是 webpack4.x,只能使用 6.x 版本https://github.com/webpack-contrib/compression-webpack-plugin/releases?page=2
7.0.0 (2020-12-02)
安装
npm i compression-webpack-plugin@6.1.1 -D
修改 vue.config.js
1 2 3 4 5 6 7 8 9 10 11 12 13 14 15 16 17 18 19 const CompressionPlugin = require ("compression-webpack-plugin" );module .exports = {configureWebpack : (config ) => {if (process.env .NODE_ENV === "production" ) {plugins .push (new CompressionPlugin ({filename : "[path][base].gz" ,algorithm : "gzip" ,test : /\.(js|css|html)$/ ,threshold : 10240 ,minRatio : 0.8 ,deleteOriginalAssets : false ,
同时 nginx 开启 gzip
server {gzip on ; gzip_comp_level 6 ; gzip_min_length 4000 ; gzip_vary on ; gzip_static on ;
8.4 结合webpack-bundle-analyzer生成的模块分析图来拆分 chunk-vendors 8.4.1 安装webpack-bundle-analyzer npm i webpack-bundle-analyzer -D
8.4.2 引入webpack-bundle-analyzer const BundleAnalyzerPlugin =require ("webpack-bundle-analyzer" ).BundleAnalyzerPlugin ;module .exports = {configureWebpack : (config ) => {plugins .push (new BundleAnalyzerPlugin ());
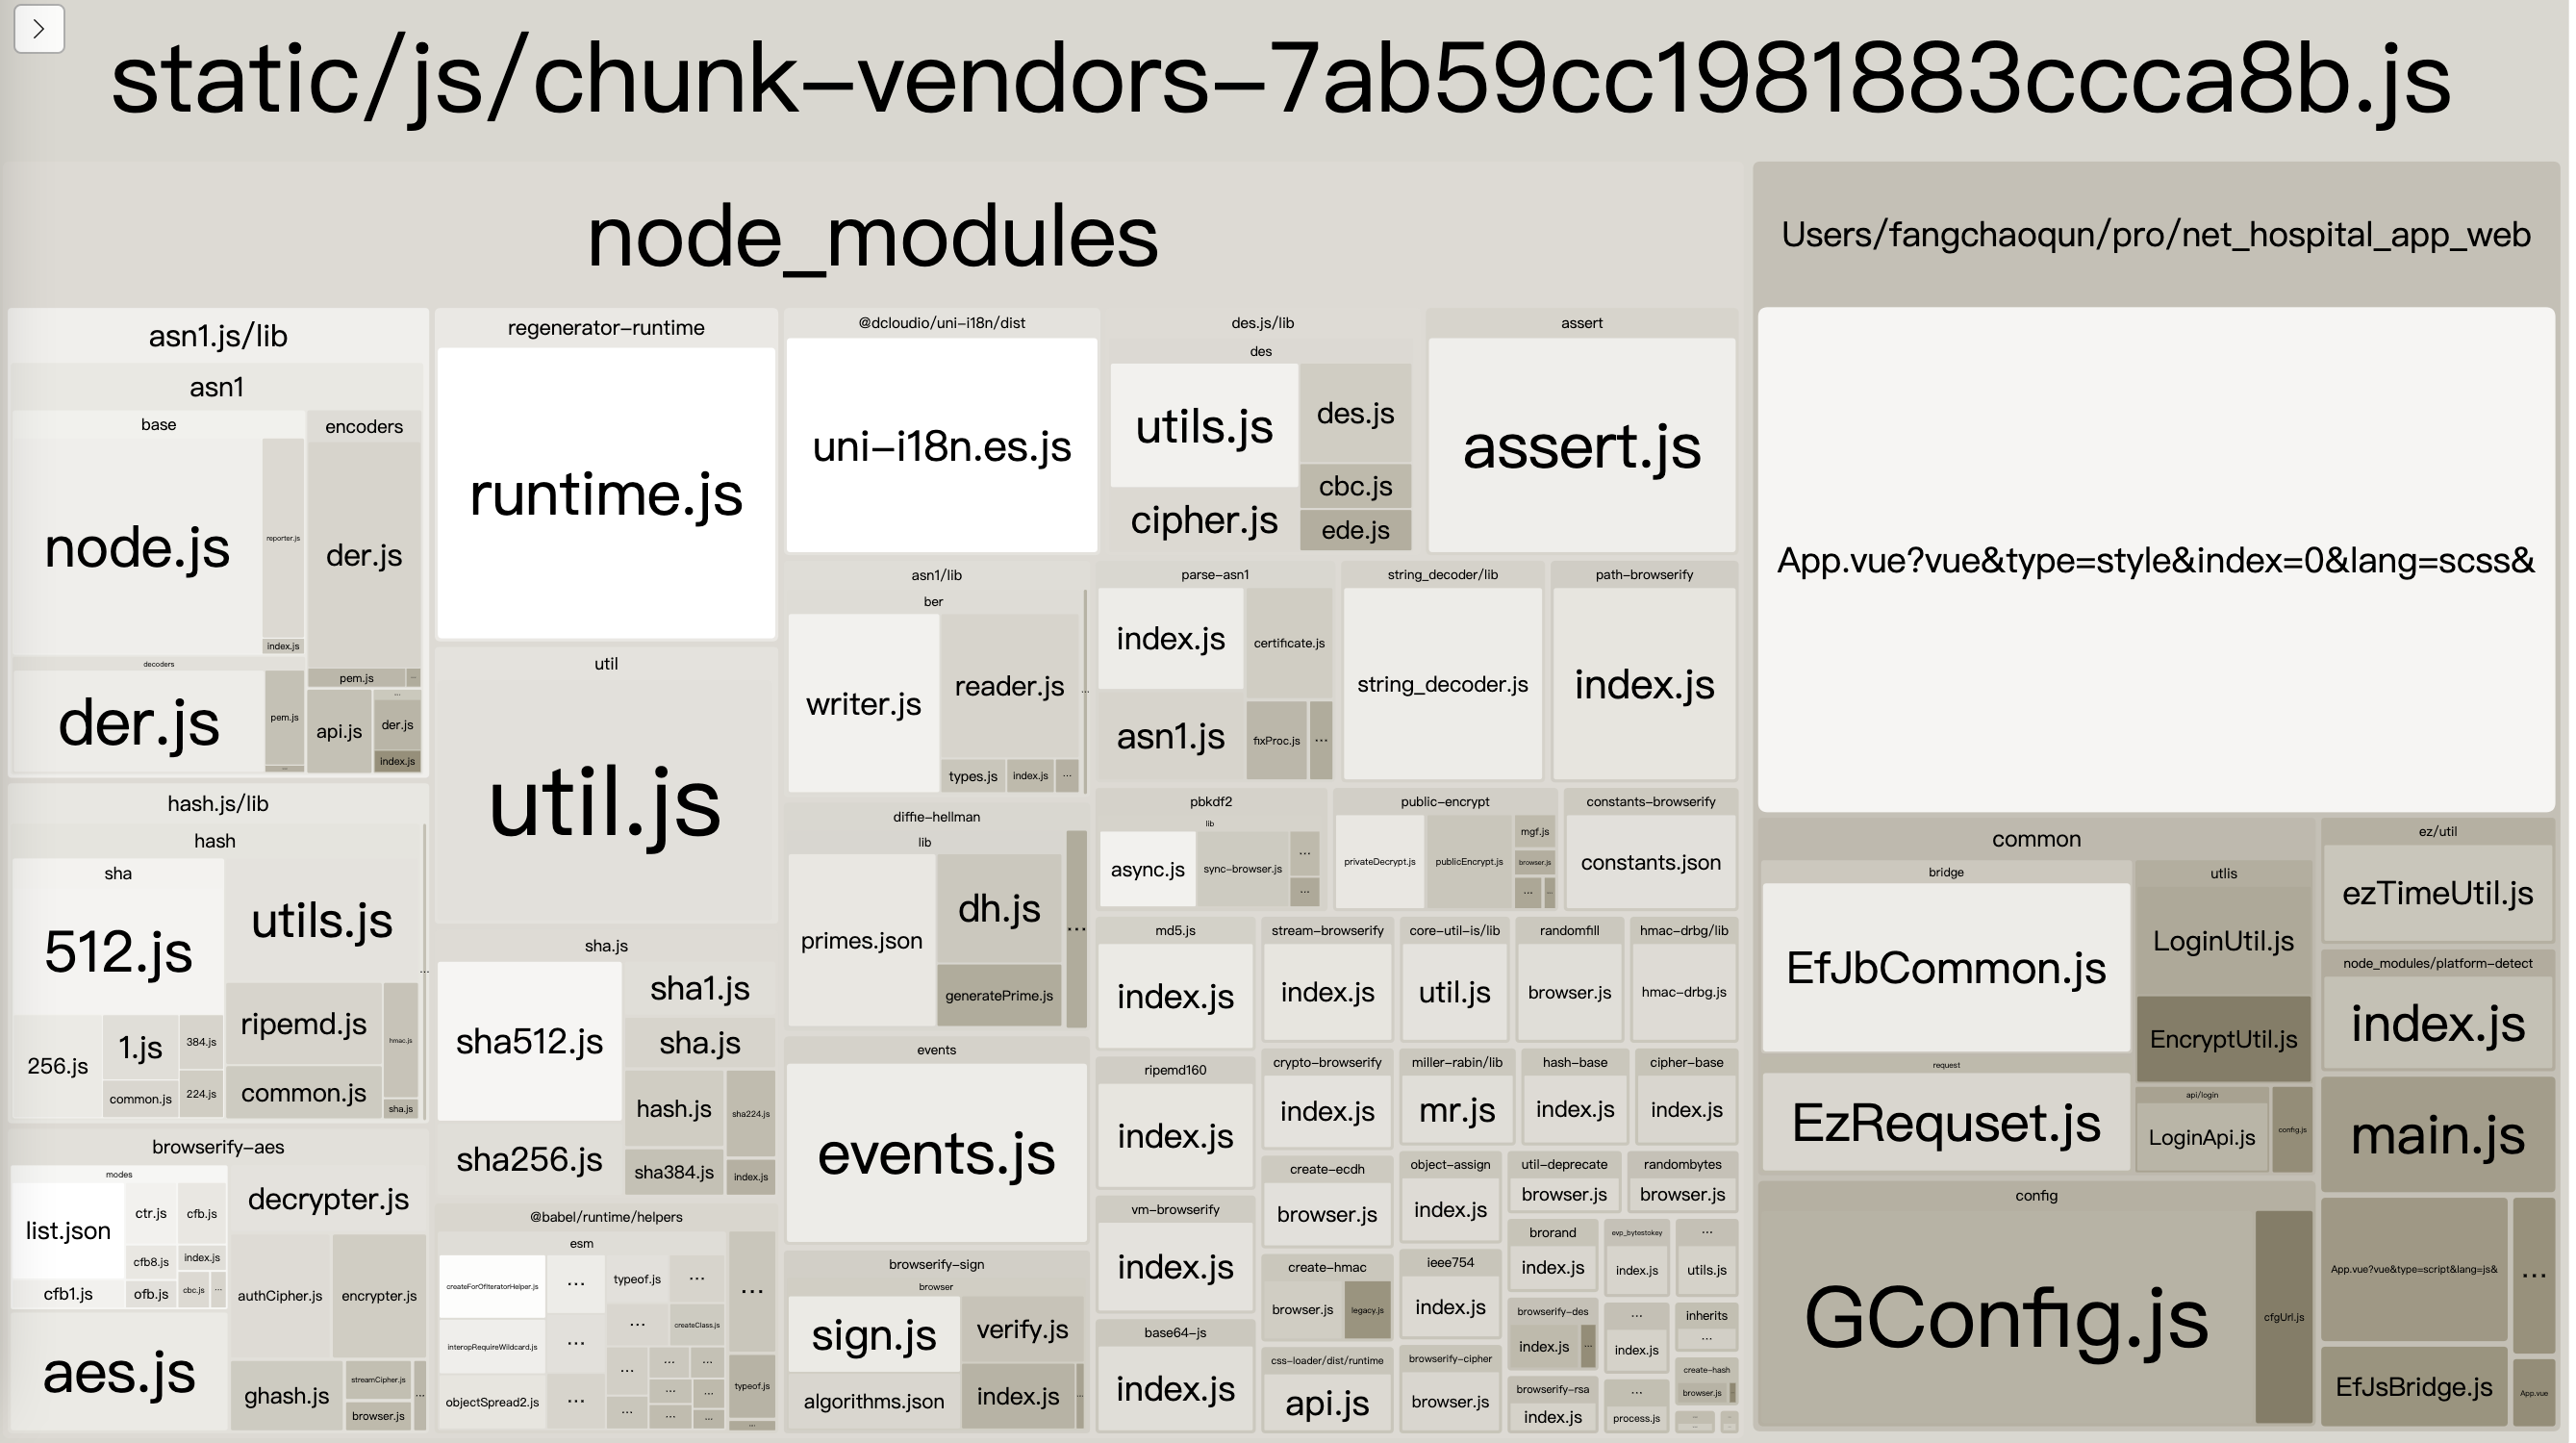
如下图所示,chunk-vendors 的组成,是把那些公共的依赖全部都打包在一起了,文件大小达到 1M 以上,严重影响页面加载速度,生成环境上 gzip 压缩后,首页加载也需要将近 10s 左右,令人汗颜。(这里的拆分视具体项目而定)
需要将@dcloudio(658kb)拆分为”uni-h5”部分和”vue-cli-plugin-uni”部分
将core-js(282kb)单独拆出来
将node-rsa(112kb)单独拆出来
将bn.js(88kb)单独拆出来
…
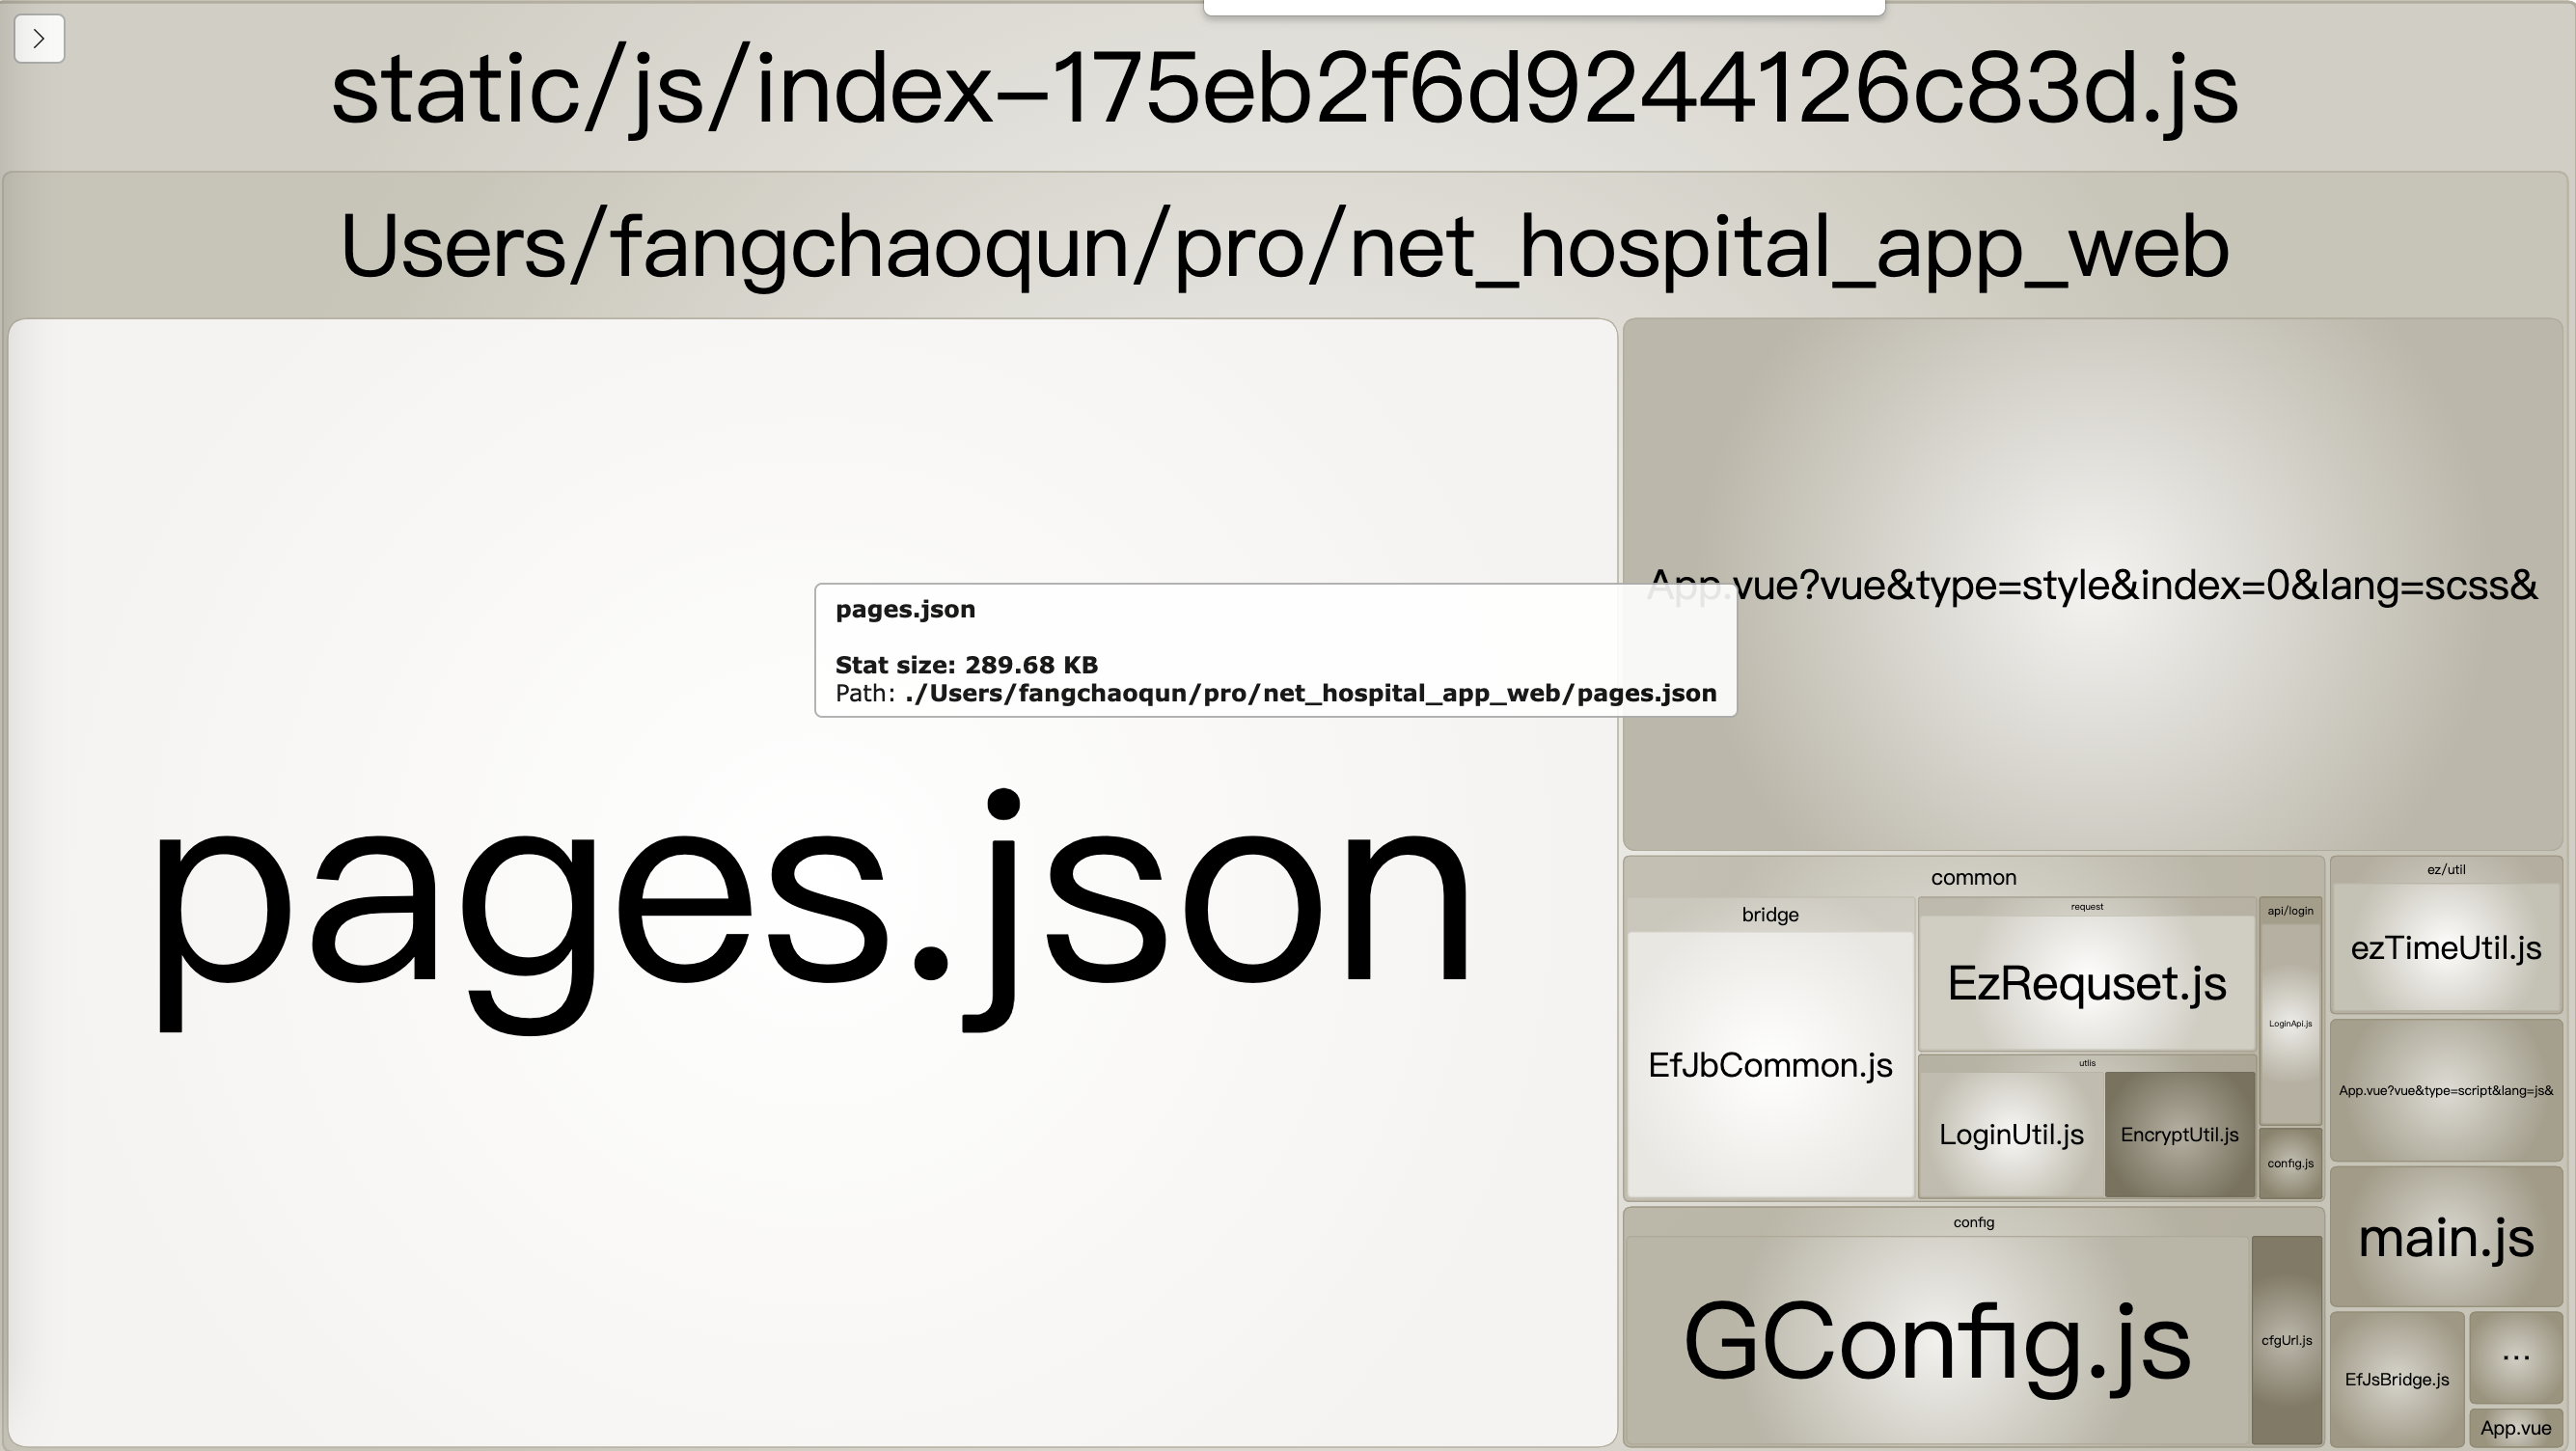
入口 index 文件也达到了几乎 350kb,里面有一个大的 pages.json 文件
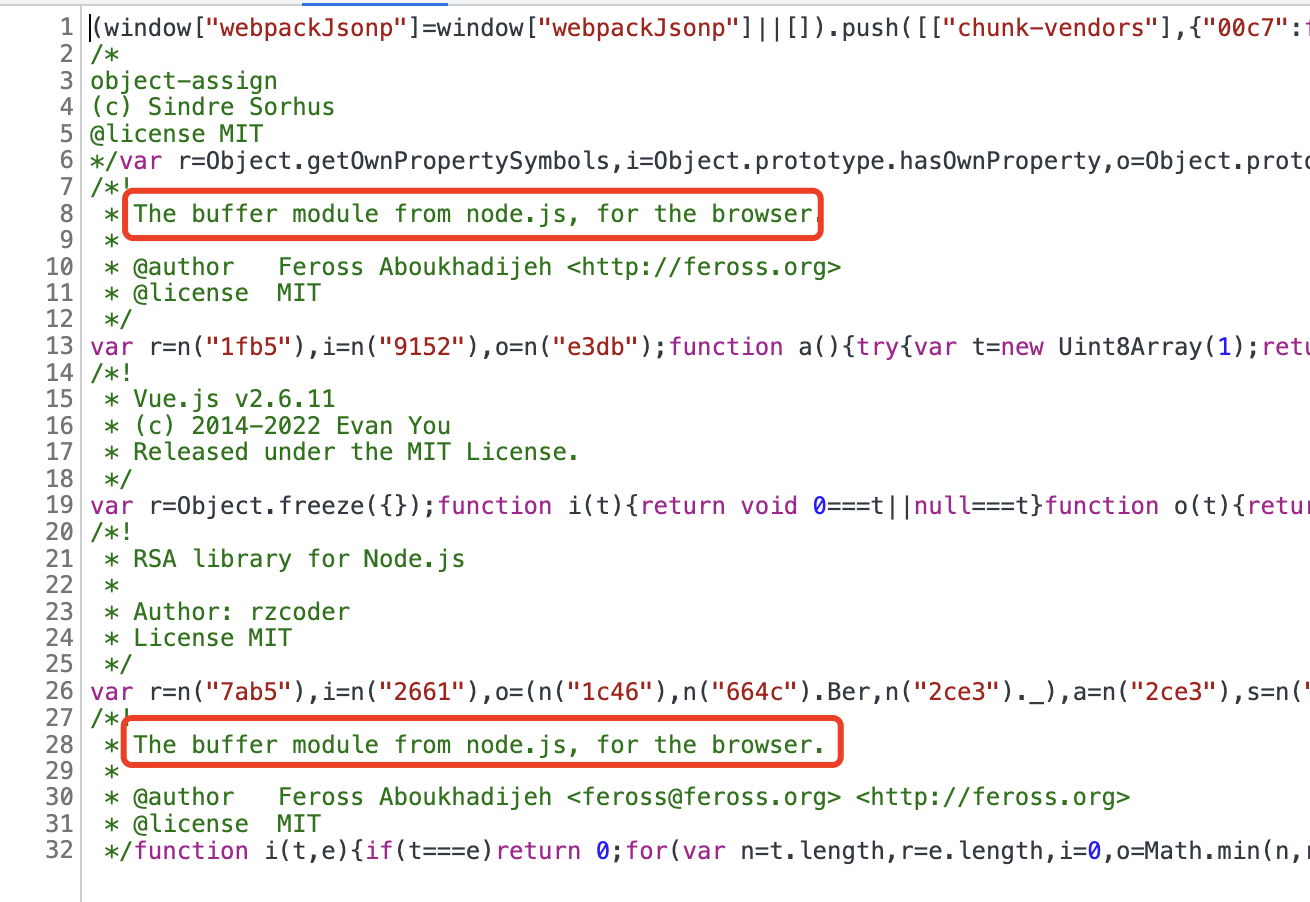
在浏览器上看 chunk-vendors,还有一个buffer模块
8.4.3 optimization.splitChunks拆分模块
这里是 webpack4
1 2 3 4 5 6 7 8 9 10 11 12 13 14 15 16 17 18 19 20 21 22 23 24 25 26 27 28 29 30 31 32 33 34 35 36 37 38 39 40 41 42 43 44 45 46 47 48 49 50 51 52 53 54 55 56 57 58 59 60 61 62 63 64 65 66 67 68 69 70 71 72 73 74 75 76 77 78 79 80 81 82 83 84 85 86 87 88 89 90 91 module .exports = {chainWebpack : (config ) => {optimization .splitChunks ({chunks : "all" , automaticNameDelimiter : "~" , name : function (module , chunks, cacheGroupKeyconst moduleFileName = module identifier ()split ("/" )reduceRight ((item ) => item);const allChunksNames = chunks.map ((item ) => item.name ).join ("~" );return `${moduleFileName} ` ;cacheGroups : {vendors : {name : "chunk-vendors" ,chunks : "initial" ,reuseExistingChunk : true ,enforce : true , priority : 0 , minSize : 30000 ,pages : {name : "chunk-pages" ,test : /pages\.json$/ ,chunks : "all" ,reuseExistingChunk : true ,enforce : true ,priority : 90 ,minChunks : 1 ,minSize : 10000 ,"node-rsa" : {name : "chunk-node-rsa" ,test : /node-rsa/ ,chunks : "all" ,reuseExistingChunk : true ,enforce : true ,priority : 70 ,buffer : {name : "chunk-buffer" ,test : /buffer|is-buffer/ ,chunks : "all" ,reuseExistingChunk : true ,priority : 90 ,minChunks : 1 ,minSize : 15000 ,enforce : true ,"core-js" : {name : "chunk-core-js" ,test : /core-js/ ,chunks : "initial" ,reuseExistingChunk : true ,enforce : true ,priority : 70 ,"uni-h5" : {name : "chunk-uni-h5" ,test : /uni-h5/ ,chunks : "initial" ,reuseExistingChunk : true ,enforce : true ,priority : 80 ,vue : {name : "chunk-vue" ,test : /vue-cli-plugin-uni/ ,chunks : "initial" ,reuseExistingChunk : true ,enforce : true ,priority : 85 ,bn : {name : "chunk-bn" ,test : /bn/ ,chunks : "initial" ,reuseExistingChunk : true ,enforce : true ,priority : 70 ,optimization .runtimeChunk ("single" );
8.4.4 拆分的 chunk 没有在index.html中自动引入
打包很成功,没任何报错,但是在运行项目的时候,页面一片空白,没任何 ui 展示。问题就出在,拆分出来的各个小 chunk,没有自动在 index.html 中引入 ,我们可以在打包出来的 unpackage 目录,本地启动一个静态服务,把那些 chunk 手动引入,刷新页面,页面 ui 显示出来了
所以我们需要找到html-webpack-plugin 的配置,把我们单独拆分出来的 chunk,添加到chunks配置中
1 2 3 4 5 6 7 8 9 10 11 12 13 14 15 16 17 18 19 20 21 22 23 24 25 26 27 28 29 30 31 32 33 34 35 36 37 function changeHtmlWebpackPluginChunks (config ) {const plugins = config.plugins ;const chunkArr = ["runtime" ,"chunk-vue" ,"chunk-uni-h5" ,"chunk-core-js" ,"chunk-node-rsa" ,"chunk-buffer" ,"chunk-bn" ,"chunk-pages" ,forEach ((item, index ) => {if (options &&Object .prototype toString .call (item.options ) === "[object Object]" &&Object .hasOwnProperty .call (item.options , "filename" ) &&Object .hasOwnProperty .call (item.options , "chunks" ) &&options .filename === "index.html" const oldChunks = item.options .chunks || [];options .chunks = [...chunkArr, ...oldChunks];module .exports = {configureWebpack : (config ) => {if (process.env .NODE_ENV === "production" ) {changeHtmlWebpackPluginChunks (config);
下图是拆分后 chunk-vendors,和之前对比,那些大模块都被拆分出去了,文件体积也从 1M 多变成了 320kb,首页加载也从 10s 多变成了 3s 左右。
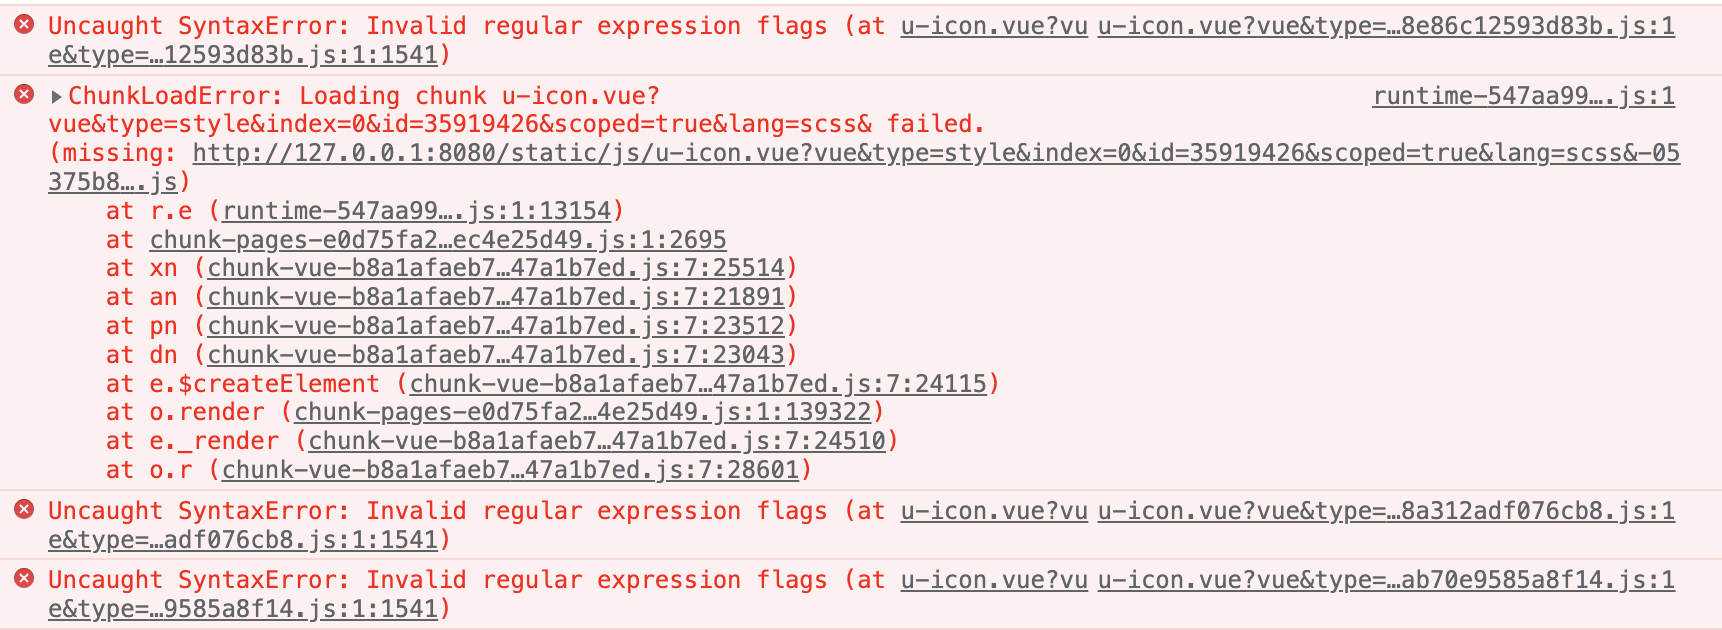
8.4.5 关于拆分 vendors 后,uview-ui部分组件报错
项目中使用到了uview-uiui 框架
重新打包,本地再次启动项目,浏览器控制台发现如下报错
再到 unpackage 目录一看,居然还有u-icon.vue和u-line.vue未打包!
那单独提取这两个文件为 chunk 进行打包,再次打包后启动项目,这两个组件没报错,其他组件报错了,unpackage 目录里出现了更多的”u-xx.vue”组件,这是什么情况?
猜测是引入 uview-ui 框架时的easycom 组件模式 惹得鬼,我尝试着在 easycom 里添加自定义custom配置,把这两个组件写在里面,但是不管用。页面不报错,但是样式出问题了。。。
或者直接删除 easycom 配置进行,启动项目,页面样式出问题了。。。
最终还是在splitChunks里单独提取 uview-ui 为 chunk,这样问题是解决了,但是这样在入口的时候,就要加载一个提取出来的 uview-ui(项目中使用到的所有 uview-ui 组件,并非整个 uview-ui)。未拆分前,每个页面只需加载自己所需的组件,现在把所有页面的组件都提取出来了,等于是每个页面都加载了冗余的 uview-ui 组件。好在是最终页面加载速度是比之前快了。
这里有知道怎么处理的,或者有遇到相同问题的,分享下怎么处理。
8.4.6 拆分为各个小 chunk 后,页面 js 请求变多了
页面 js 请求变多,对页面性能也有一定影响,所以这里拆分,视具体项目而定。
9. hbuilderx 创建的项目,h5 持续部署
这里视公司内部情况而定,我这是服务器上有现成的 nginx,也无需自己打包 docker 镜像
.gitlab.yml
SSH_USERNAME,SSH_HOST,SSH_PASSWORD 这 3 个变量写在项目Setting->CI/CD->Variables里
1 2 3 4 5 6 7 8 9 10 11 12 13 14 15 16 17 18 stages: - build job_build: stage: build script: - if yum list installed | grep 'sshpass' ; then echo yes ; else yum -y install sshpass;fi - sh deploy.sh $SSH_USERNAME $SSH_HOST $SSH_PASSWORD tags: - xxxx only: - main
deploy.sh
将打包出来的文件,上传到服务器指定目录,然后页面就可以访问了
为什么要将打包出来的代码进行压缩,因为打包出来的文件数量很多,如果一个个传输,会非常慢,所以要进行压缩后变成 1 个文件进行传输
1 2 3 4 5 6 7 8 9 10 11 12 13 14 15 16 17 18 19 20 21 22 23 24 25 26 27 28 29 30 31 32 33 34 35 36 37 38 39 #!/bin/bash echo "ssh deploy start==>" $1 $2 $3 dir ="./unpackage/dist/build/h5" "/home/demo_h5/nginx/html/app-web" cd ${dir} ${password} scp ./build.zip ${username} @${host} :${target} sleep 2${password} ssh ${username} @${host} "cd /home/demo_h5/nginx/html/app-web && pwd && unzip -o -q ./build.zip -d ./ && rm -rf ./build.zip" echo "ssh deploy end==>"
git 提交代码
不出意外,代码自动部署到相应位置,浏览器可以访问了
$ if yum list installed | grep 'sshpass'; then echo yes; else yum -y install sshpass;fi
10. 参考资料
uniapp 官方文档 webpack4 官方文档 vue-cli 官方文档