如题,是基于HbuilderX创建的小程序项目,非cli方式创建的项目
1.啰嗦两句
省流(得出结论):
uniapp HbuilderX方式被高度封装,都被封装到他的应用里去了,虽暴露出来的几个文件和方法,后续配置起来还是费劲。
而用vue-cli方式创建的,配置文件全部暴露,方便后续修改
2.开始配置
根据文档
npm install -D tailwindcss安装
npx tailwindcss init,生成tailwind.config.js 配置文件
1 2 3 4 5 6 7 8 9 10 11 12 13 14 15 16 17 18 19 20 21 22 23 24 25 module .exports = {separator : '__' , corePlugins : { preflight : false , space : false , divideWidth : false , divideColor : false , divideStyle : false , divideOpacity : false , content : ['./pages/**/*.{vue,js}' ,'./App.vue' , theme : {extend : {},plugins : [],
根目录新建tailwind-input.css
@tailwind components;@tailwind utilities;
开启 Tailwind CLI 构建流程
npx tailwindcss -i ./tailwind-input.css -o ./static/css/tailwind.css --watch
App.vue中引入编译过的tailwind.css
<style lang="scss">+ @import url("./static/css/tailwind.css");
其实到这里已经ok了,缺点就是每次运行项目都要自己手动去执行npx tailwindcss -i ./tailwind-input.css -o ./static/css/tailwind.css --watch,不方便
3.启动项目自动化tailwindcss编译
庆幸的是,uniapp官方暴露出来了vue.config.js,我们可以在这里面配置
3.1 package.json中添加自定义脚本运行 1 2 3 4 5 6 7 8 9 10 11 12 13 14 15 16 17 18 19 20 21 22 23 24 25 26 27 28 29 30 31 32 33 34 35 36 37 38 39 40 41 42 43 44 45 46 47 48 49 50 51 52 53 54 55 56 57 58 { "scripts" : { "tailwind:dev" : "npx tailwindcss -i ./tailwind-input.css -o ./static/css/tailwind.css --watch" , "tailwind:prod" : "npx tailwindcss -i ./tailwind-input.css -o ./static/css/tailwind.css" } , "uni-app" : { "scripts" : { "dev:mp-weixin:dev" : { "title" : "本地开发-测试环境接口" , "browser" : "" , "env" : { "UNI_PLATFORM" : "mp-weixin" , "NODE_ENV" : "development" , "BASE_URL_ENV" : "development" } , "define" : { "CUSTOM-CONST" : true } } , "dev:mp-weixin:prod" : { "title" : "本地开发-正式环境接口" , "browser" : "" , "env" : { "UNI_PLATFORM" : "mp-weixin" , "NODE_ENV" : "development" , "BASE_URL_ENV" : "production" } , "define" : { "CUSTOM-CONST" : true } } , "build:mp-weixin:dev" : { "title" : "打包-测试环境接口" , "browser" : "" , "env" : { "UNI_PLATFORM" : "mp-weixin" , "NODE_ENV" : "production" , "BASE_URL_ENV" : "development" } , "define" : { "CUSTOM-CONST" : true } } , "build:mp-weixin:prod" : { "title" : "打包-正式环境接口" , "browser" : "" , "env" : { "UNI_PLATFORM" : "mp-weixin" , "NODE_ENV" : "production" , "BASE_URL_ENV" : "production" } , "define" : { "CUSTOM-CONST" : true } } } } }
3.2 根目录新建vue.config.js
利用child_process.exec执行子进程,运行npx tailwindcss -i ./tailwind-input.css -o ./static/css/tailwind.css --watch,
问题也就出现在这,child_process.exec默认用的是/bin/sh执行,虽然可以配置修改成{shell: '/bin/bash'}或者{shell: '/bin/zsh'},
但是tailwindcss每次都报错,因为HbuilderX执行vue.config.js里采用的nodejs版本是v12,通过console.log(process.version)可以看到nodejs当前版本
为什么它这里采用的是nodejs v12版本,暂不清楚,但本地zsh,执行node -v,是v16版本
nodejs v12版本执行tailwindcss编译,Npx tailwindcss results in “Unexpected Token .”
根据提示,解决办法就是切换当前nodejs版本为v16
1 2 3 4 5 6 7 8 9 10 11 12 13 14 15 16 17 18 19 20 21 22 23 const {exec} = require ('child_process' );console .log ("process.env.UNI_SCRIPT:" , process.env .UNI_SCRIPT );console .log ("process.env.NODE_ENV:" , process.env .NODE_ENV );console .log ("当前nodejs版本" , process.version );const isDev = process.env .NODE_ENV === 'development' ;exec ('npm run tailwind:dev' : '"npm run tailwind:prod' ,cwd : __dirname, shell : "/bin/bash" , },(error, stdout, stderr ) => { if (error) { console .error ('[tailwindcss error]' , error);console .error ("error.stderr:" , stderr);console .log (`[tailwindcss stdout]: ${stdout} ` )console .log ('[tailwindcss] 生产环境打包完成' );module .exports = {};
报错信息如下:
1 2 3 4 5 6 7 8 9 10 11 12 13 14 15 16 17 18 19 20 21 22 [tailwindcss error] Error: Command failed: npm run tailwind:dev14 :38:24.610 Unexpected token '.'14 :38:24.622 npm ERR! code ELIFECYCLE14 :38:24.623 npm ERR! errno 1 14 :38:24.638 npm ERR! @ tailwind:dev: `npx tailwindcss -i ./tailwind-input.css -o ./static/css/tailwind.css --watch`14 :38:24.639 npm ERR! Exit status 1 14 :38:24.652 npm ERR! 14 :38:24.668 npm ERR! Failed at the @ tailwind:dev script.14 :38:24.669 npm ERR! This is probably not a problem with npm. There is likely additional logging output above.14 :38:24.686 npm ERR! A complete log of this run can be found in:14 :38:24.702 npm ERR! /Users/xxx/.npm/_logs/2023 -07 -18 T06_38_23_626Z-debug.log14 :38:24.719 at ChildProcess.exithandler (child_process.js:308 :12 )14 :38:24.740 at ChildProcess.emit (events.js:314 :20 )14 :38:24.757 at maybeClose (internal/child_process.js:1022 :16 )14 :38:24.774 at Socket.<anonymous> (internal/child_process.js:444 :11 )14 :38:24.790 at Socket.emit (events.js:314 :20 )14 :38:24.791 at Pipe.<anonymous> (net.js:675 :12 ) {14 :38:24.807 killed: false,14 :38:24.810 code: 1 ,14 :38:24.825 signal: null,14 :38:24.840 cmd: 'npm run tailwind:dev'14 :38:24.841 }
3.3 在vue.config.js中切换nodejs版本 3.3.1 原本想直接nvm use v16.14.2,但是nvm命令找不到 console.log ("当前nodejs版本" , process.version );"nvm use 16.14.2" , { cwd: __dirname, shell : "/bin/bash" , }, error => {error (error );
报错信息如下:
当前nodejs版本 v12.22.1Error : Command failed: nvm use 16.14.214 :49:05.163 /bin/bash: nvm: command not found14 :49:05.172 at ChildProcess.exithandler (child_process.js:308:12)14 :49:05.172 at ChildProcess.emit (events.js:314:20)14 :49:05.184 at maybeClose (internal/child_process.js:1022:16)14 :49:05.185 at Socket.<anonymous> (internal/child_process.js:444:11)14 :49:05.197 at Socket.emit (events.js:314:20)14 :49:05.197 at Pipe.<anonymous> (net.js:675:12) {14 :49:05.209 killed: false,14 :49:05.212 code: 127,14 :49:05.226 signal: null,14 :49:05.244 cmd: 'nvm use 16.14.2'14 :49:05.260 }
3.3.2 shelljs登场
这破烂child_process.exec,不折腾了,用shelljs
vue.config.js
const shell = require ('shelljs' );const isDev = process.env .NODE_ENV === 'development' ;cd (__dirname);exec ('bash ./tailwindcss.sh development' , {shell : "/bin/bash" ,async :true })exec ('bash ./tailwindcss.sh production' , {shell : "/bin/bash" ,async :true });module .exports = {};
根目录新建tailwindcss.sh
1 2 3 4 5 6 7 8 9 10 11 12 13 14 15 16 17 18 19 20 21 22 23 24 25 26 27 28 29 30 31 32 33 34 35 #!/bin/bash $1 "development" echo "当前NODE_ENV:" echo $CURRENT_NODE_ENV cd $(dirname $0 );echo "当前目录:" pwd source ~/.nvm/nvm.sh;echo "切换后nodejs版本:" if [ $CURRENT_NODE_ENV == $DEVELOPMENT ]then else fi echo "tailwindcss 执行错误,请检查" ;sleep 3
当执行Hbuilderx顶部菜单运行 - 本地开发-测试环境接口
此时nodejs版本倒是正确切换了,tailwindcss也正确执行了,但是shell命令执行阻塞了,停留在那不继续往下执行了(HbuilderX不继续编译vue为小程序了)
正在编译中...15 :19:40.696 process.env.UNI_SCRIPT: dev:mp-weixin:dev15 :19:40.705 process.env.NODE_ENV: development15 :19:40.706 isDev: true15 :19:40.716 当前nodejs版本 v12.22 .1 15 :19:40.766 当前NODE_ENV:15 :19:40.766 development15 :19:43.041 Now using node v16.14 .2 (npm v8.5 .0 )15 :19:43.051 切换后nodejs版本:15 :19:43.068 v16.14 .2 15 :19:43.450 > tailwind:dev15 :19:43.461 > npx tailwindcss -i ./tailwind-input.css -o ./static/css/tailwind.css --watch15 :19:44.696 Rebuilding...15 :19:45.038 Done in 388m s.
3.3.3 shell执行阻塞解决
两种方法:
1 shell.exec('bash ./tailwindcss.sh development', {shell: "/bin/bash", async:true})
2 shell.exec('bash ./tailwindcss.sh development &', {shell: "/bin/bash"})
3.3.4 又遇坎坷,uview-ui报错
好不容易让tailwindcss正常编译,但是项目中的uview ui又报错了,心累
报错信息如下:
1 2 3 4 5 6 7 8 9 10 11 12 13 14 15 16 17 18 19 20 21 22 23 Module parse failed: Unexpected token (224 :64 )15 :28 :17 .218 File was processed with these loaders:15 :28 :17 .234 * ./node_modules/babel-loader/lib/index.js15 :28 :17 .287 * ./node_modules/@dcloudio/vue-cli-plugin-uni/packages/webpack-preprocess-loader/index.js15 :28 :17 .319 * ./node_modules/@dcloudio/webpack-uni-mp-loader/lib/script.js15 :28 :17 .321 * ./node_modules/@dcloudio/vue-cli-plugin-uni/packages/vue-loader/lib/index.js15 :28 :17 .405 * ./node_modules/@dcloudio/webpack-uni-mp-loader/lib/style.js15 :28 :17 .430 You may need an additional loader to handle the result of these loaders.15 :28 :17 .475 | const grandChild = child.$children; // 判断如果在需要重新初始化的组件数组中名中,并且存在init方法的话,则执行15 :28 :17 .476 | 15 :28 :17 .503 > if (names.includes(child.$options.name) && typeof child?.init === 'function') {15 :28 :17 .504 | // 需要进行一定的延时,因为初始化页面需要时间15 :28 :17 .530 | uni.$u.sleep(50 ).then(() => {15 :28 :17 .531 Module parse failed: Unexpected token (3 :49 )15 :28 :17 .551 File was processed with these loaders:15 :28 :17 .551 * ./node_modules/babel-loader/lib/index.js15 :28 :17 .663 * ./node_modules/@dcloudio/vue-cli-plugin-uni/packages/webpack-preprocess-loader/index.js15 :28 :17 .694 You may need an additional loader to handle the result of these loaders.15 :28 :17 .695 | // 看到此报错,是因为没有配置vue.config.js的【transpileDependencies】,详见:https://www.uviewui.com/components/npmSetting.html#_5-cli模式额外配置15 :28 :17 .714 | const pleaseSetTranspileDependencies = {},15 :28 :17 .715 > babelTest = pleaseSetTranspileDependencies?.test; // 引入全局mixin15 :28 :17 .740 | 15 :28 :17 .891 | import mixin from './libs/mixin/mixin.js'; // 小程序特有的mixin
根据提示,是要在vue.config.js中添加transpileDependencies配置:
module .exports = {transpileDependencies : ['uview-ui' ]
修改后,继续执行,还是同样的报错,根据uview ui 文档,Hbuilderx方式安装无需再vue.config.js中添加transpileDependencies配置
删掉刚才的transpileDependencies: ['uview-ui']配置
难道要用uview ui提供的npm方式 安装吗?试了一遍,还是同样的报错,默默的撤回了修改
3.3.5 uview-ui报错的分析解决
其实就是,tailwindcss的编译不能和HbuilderX编译小程序在同一时间执行,要错开
可以新开一个shell窗口执行tailwindcss编译
或者在子进程中执行tailwindcss编译
或者拿到HbuilderX编译小程序完毕后打开微信开发者工具的回调,然后再另执行tailwindcss编译
setTimeout大法
const shell = require ('shelljs' );const isDev = process.env .NODE_ENV === 'development' ;setTimeout (() => {cd (__dirname);exec ('bash ./tailwindcss.sh development &' , {shell : "/bin/bash" })exec ('bash ./tailwindcss.sh production' , {shell : "/bin/bash" ,async :true });30000 ); module .exports = {};
可以看到,HbuilderX先进行了vue编译成小程序,然后tailwindcss进行监听编译,先后顺序错开,执行ok
修改文件也可以生效
1 2 3 4 5 6 7 8 9 10 11 12 13 14 15 16 17 18 19 20 21 22 23 24 25 26 27 28 29 30 31 32 process.env.UNI_SCRIPT: dev:mp-weixin:dev15 :43:08.945 process.env.NODE_ENV: development15 :43:08.958 isDev: true15 :43:08.973 当前nodejs版本 v12.22 .1 15 :43:10.582 Browserslist: caniuse-lite is outdated. Please run:15 :43:10.593 npx browserslist@latest --update-db15 :43:27.934 项目 'xxx' 编译成功。前端运行日志,请另行在小程序开发工具的控制台查看。15 :43:27.951 正在启动微信开发者工具...15 :43:28.941 [微信小程序开发者工具] - initialize15 :43:28.952 [微信小程序开发者工具]15 :43:28.953 [微信小程序开发者工具]15 :43:29.029 [微信小程序开发者工具] ✔ IDE server has started, listening on http://127.0.0.1 :59243 15 :43:29.075 [微信小程序开发者工具]15 :43:29.092 [微信小程序开发者工具] - open IDE15:43:29.169 [微信小程序开发者工具]15:43:29.169 [微信小程序开发者工具]15 :43:29.895 [微信小程序开发者工具] ✔ open IDE15 :43:29.910 [微信小程序开发者工具]15 :43:29.911 微信开发者工具已启动,在HBuilderX中修改文件并保存,会自动刷新微信模拟器15 :43:29.932 注:15 :43:29.961 1 . 可以通过微信开发者工具切换pages.json中condition配置的页面,或者关闭微信开发者工具,然后再从HBuilderX中启动指定页面15 :43:29.992 2 . 如果出现微信开发者工具启动后白屏的问题,检查是否启动多个微信开发者工具,如果是则关闭所有打开的微信开发者工具,然后再重新运行15 :43:30.024 3 . 运行模式下不压缩代码且含有sourcemap,体积较大;若要正式发布,请点击发行菜单进行发布15 :43:39.028 当前NODE_ENV:15 :43:39.028 development15 :43:42.386 Now using node v16.14 .2 (npm v8.5 .0 )15 :43:42.401 切换后nodejs版本:15 :43:42.425 v16.14 .2 15:43:43.144 > tailwind:dev15:43:43.162 > npx tailwindcss -i ./tailwind-input.css -o ./static/css/tailwind.css --watch15 :45:29.429 项目 'xxx' 编译成功。前端运行日志,请另行在小程序开发工具的控制台查看。
setTimeout大法虽好,但是不优雅,30s不保证HbuilderX编译vue能结束
3.3.6 最终版本-优雅解决uview-ui的报错
这里还是用到了child_process.exec子进程执行,境泽真香定律!
child_process.exec执行shell可能会遇上Permission denied无权限执行, chmod(u+x, /xx.sh)解决
1 2 3 4 5 6 7 8 9 10 11 12 13 14 15 16 17 18 19 20 21 22 23 24 25 26 27 28 29 30 31 32 33 34 35 36 37 38 39 const path = require ("path" );const shell = require ('shelljs' );const {exec} = require ('child_process' );console .log ("process.env.UNI_SCRIPT:" , process.env .UNI_SCRIPT );console .log ("process.env.NODE_ENV:" , process.env .NODE_ENV );const isDev = process.env .NODE_ENV === 'development' ;console .log ("isDev:" , isDev);console .log ("当前nodejs版本" , process.version );function executeTailWindCssSh (exec ('"./tailwindcss.sh" development' : '"./tailwindcss.sh" production' ,cwd : __dirname, shell : "/bin/bash" , },(error, stdout, stderr ) => {if (error) { console .error ('[tailwindcss error]' , error);console .error ("error.stderr:" , stderr);if (stderr && stderr.includes ("Permission denied" )) {chmod ("u+x" , path.resolve (__dirname, './tailwindcss.sh' ));executeTailWindCssSh ();console .log (`[tailwindcss stdout]: ${stdout} ` )console .log ('[tailwindcss] 生产环境打包完成' );executeTailWindCssSh ();module .exports = {};
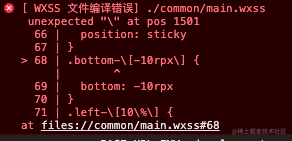
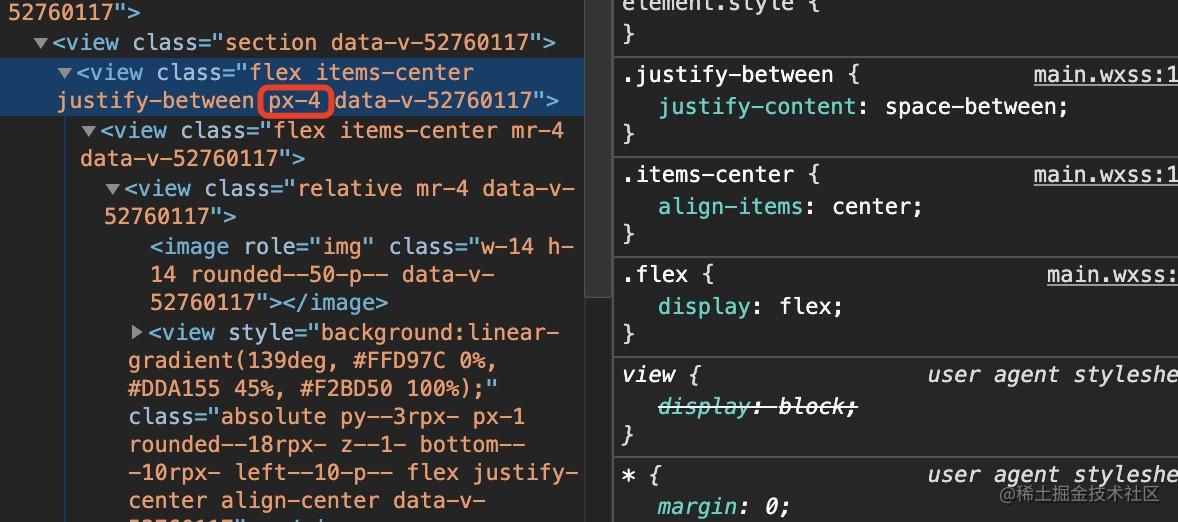
4. 关于小程序中部分class名称转义字符报错 报错如下图:
解决:使用@dcasia/mini-program-tailwind-webpack-plugin webpack 插件解决
安装
npm i @dcasia/mini-program-tailwind-webpack-plugin -D
配置
const MiniProgramTailwindWebpackPlugin = require ("@dcasia/mini-program-tailwind-webpack-plugin" );module .exports = {configureWebpack : {plugins : [new MiniProgramTailwindWebpackPlugin ({})
这样就ok了,如果需要深入自定义些,可以引入mini-program-tailwind 的handleTemplate和handleStyle方法,自定义一个webpacka plugin
1 2 3 4 5 6 7 8 9 10 11 12 13 14 15 16 17 18 19 20 21 22 23 24 25 26 27 28 29 30 31 32 33 34 35 36 37 38 39 40 41 42 43 44 45 46 47 48 49 50 51 52 53 54 55 56 57 58 59 60 61 62 63 64 65 66 67 68 const { handleTemplate, handleStyle } = require ('@dcasia/mini-program-tailwind-webpack-plugin/universal-handler' );function isStyleFile (filename) {return /.+\.(?:wx|ac|jx|tt|q|c)ss$/ .test (filename);function isTemplateFile (filename ) {return /.+\.(wx|ax|jx|ks|tt|q)ml$/ .test (filename);class TailwindCssClassRenamePlugin {constructor (this .options = { enableRpx : false ,designWidth : 375 ,apply (compiler ) {hooks .thisCompilation .tap ('tailwind-css-class-rename-plugin' ,compilation =>hooks .afterOptimizeAssets .tap ('tailwind-css-class-rename-plugin' , assets =>for (const pathname in assets) {const originalSource = assets[ pathname ]const rawSource = originalSource.source ().toString ()let handledSource = '' if (isStyleFile (pathname)) {handleStyle (rawSource, this .options );else if (isTemplateFile (pathname)) {handleTemplate (rawSource, this .options );if (handledSource) {const source = new ConcatSource (handledSource)updateAsset (pathname, source)module .exports = {configureWebpack : {plugins : [new TailwindCssClassRenamePlugin ()
5. 关于rem转rpx
其实上面的@dcasia/mini-program-tailwind-webpack-plugin/universal-handler插件中的handleStyle方法已经自动帮我们处理了rem转rpx
也可以使用tailwindcss-rem2px-preset 插件,或者postcss-rem-to-responsive-pixel 插件,tailwindcss-rem2px-preset只是把tailwindcss那些样式class从rem转为rpx,而postcss-rem-to-responsive-pixel是把项目中所有的rem都转为rpx,根据自己的项目进行选择
因为这里是使用的HbuilderX方式创建的项目,所以选择了tailwindcss-rem2px-preset,而postcss-rem-to-responsive-pixel是在postcss.config.js配置文件里配置的
4 tailwindcss-rem2px-preset的安装和使用
安装
npm i -D postcss-rem-to -responsive-pixel
使用
module .exports = {presets : [require ('tailwindcss-rem2px-preset' ).createPreset ({fontSize : 32 ,unit : 'rpx'
6. 关于部分tailwindcss未生效 如果没有在tailwind.config.js中配置tailwindcss-rem2px-preset这个预设,会发现页面中所有的tailwindcss都未生效,报错是没有了,但是有一部分class样式都没有被引入到项目中,只是在wxml上写了一个空样式
解决:这个时候只要在tailwind.config.js中配置tailwindcss-rem2px-preset这个预设,就ok了
7.参考资料
Hbuilder创建的uniapp工程,使用tailwindcss最优雅的方式
shelljs
child_process.exec
Tailwind CLI
weapp-tailwindcss
Tailwind & Windi CSS Webpack plugin


